Understanding Security Groups
Security for Windows Home Server user accounts is handled mostly (and most easily) by assigning each user to a particular security group.
For example, the default Administrator account is part of the
Administrators group. Each security group is defined with a specific set
of access and rights, and any user added to a group is automatically
granted that group’s access and rights.
Windows Home Server has three main security groups:
Administrators—
Members of this group have complete control over the server, meaning
they can access all folders and files; install and uninstall programs
(including legacy programs) and devices; create, modify, and remove user
accounts; install Windows updates, service packs, and fixes; use Safe mode;
repair Windows; take ownership of objects; and more. For safety, only
the Administrator account should be a member of this group. Remote Desktop Users—
Members of this group have access to log on to the server remotely
(from inside or outside the local area network, or LAN) using the Remote
Desktop feature. Users—
Members of this group can access files only in their own folders and in
the server’s shared folders, change their account’s password, and run
programs that don’t require administrative-level rights.
For each user and for each shared folder on the server, you can apply an access level, which determines what the user can do with the folder. There are three levels:
- Full Access—This
level means that the user has read/write permissions on the share: he
can traverse subfolders, run programs, open documents, make changes to
documents, create new files and folders, and delete files and folders.
- Read Only—This
level means that the user has read-only permission on the shared
folder: He can traverse subfolders, run programs, and open documents,
but he can’t make changes to the shared folder or any of its contents.
- No Access—This level prevents the user from even viewing a shared folder.
Besides the main security groups I mentioned earlier, Windows Home Server defines a list of groups that specify remote web access to the server’s features, such as the server Dashboard, shared folders, and the client computers:
- RA_AllowAddInAccess—Members of this group have remote access to the server’s add-in programs.
- RA_AllowComputerAccess—Members of this group have remote access to the client computers on the network.
- RA_AllowDashboardAccess—Members of this group have remote access to the Windows Home Server Dashboard.
- RA_AllowHomePageLinks—Members of this group have remote access to the links that appear on the Windows Home Server remote home page.
- RA_AllowMediaAccess—Members of this group have remote access to media streaming on Windows Home Server.
- RA_AllowNetworkAlertAccess—Members of this group can view network health alert messages.
- RA_AllowRemoteAccess—Members of this group can access the server remotely via the web.
- RA_AllowShareAccess—Members of this group have remote access to the Windows Home Server shared folders.
|
For the sake of completeness, here’s a list of the other security groups defined by Windows Home Server:
Backup Operators—
Members of this group can access the Backup program and use it to back
up and restore folders and files, no matter what access is set on those
objects. Certificate Services DCOM Access— Members of this group can add security certificates to the computer. Cryptographic Operators— Members of this group can perform cryptographic tasks. DHCP Administrators— Members of this group have full control of the DHCP service. DHCP Users— Members of this group have read-only access on the DHCP service. Distributed COM Users— Members of this group can start, activate, and use Distributed COM (DCOM) objects. Event Log Readers— Members of this group can access and read Windows Home Server’s event logs. Guests—
Members of this group have the same privileges as those of the Users
group. The exception is the default Guest account, which is not allowed
to change its account password. HomeUsers Security Group—
Members of this group are assigned security privileges for accessing a
Windows 7 homegroup. All Windows 7 user accounts (except the Guest
account) are assigned to this group if Windows Home Server joins a
homegroup. IIS_IUSRS— Members of this group can access an Internet Information Services (IIS) website installed on the Windows Home Server computer. Network Configuration Operators—
Members of this group have a subset of the Administrator-level rights
that enable them to install and configure networking features. Performance Log Users—
Members of this group can use the Performance snap-in to monitor
performance counters, logs, and alerts, both locally and remotely. Performance Monitor Users— Members of this group can use the Performance snap-in to monitor performance counters only, both locally and remotely. Power Users—
Members of this group have a subset of the Administrator group
privileges. Power Users can’t back up or restore files, replace system
files, take ownership of files, or install or remove device drivers. In
addition, Power Users can’t install applications that explicitly require
the user to be a member of the Administrators group. Print Operators— Members of this group can administer network printers. Replicator— Members of this group can replicate files across a domain. Windows Media Center—
Members of this group can access Windows Media Center on network
clients as part of Windows Home Server’s Media Center Connector
technology.
|
Adding a New User
You can’t
access Windows Home Server shares until you configure Windows Home
Server with a user account that has the same logon name as a user
account on the client computer. You have two ways to go about this:
- If the user account already exists on the client, create a new account on Windows Home Server that uses the same username.
- If
the user account doesn’t exist on the client, create the account both
on the client and on Windows Home Server. (It doesn’t matter which order
you do this; just make sure that both accounts have the same username
and password.)
Before getting to the
specifics of creating a user account on Windows Home Server, the next
few sections take you through some important password-related material.
Setting the Password Length and Complexity
Windows Home Server
maintains several password policies that determine the length and
complexity of the passwords you can assign to the Windows Home Server
accounts. Before creating an account, you should specify the policy you
want to use. You have four choices:
- Weak—This
is the default policy, and it has no restrictions on password length or
complexity. You can specify any password you want for most users (with
the exception of users granted Remote Access; see the Strong policy,
which follows). Note that this policy implies that you can set up
accounts without any password.
- Medium—This
policy requires that all passwords be at least five characters long.
This policy has no restrictions on password complexity.
- Best—This
policy requires that all passwords be at least five characters long and
that they contain three out of the following four character types:
lowercase letters, uppercase letters, numbers, and symbols (!, @, #, $,
and so on).
- Strong—This
policy requires that all passwords be at least seven characters long
and that they contain three out of the following four character types:
lowercase letters, uppercase letters, numbers, and symbols (!, @, #, $,
and so on). Note that every user who gets Remote Access must have a
strong password, even if you’ve configured Windows Home Server to use
the Weak or Medium policy.
Follow these steps to specify the Windows Home Server password policy:
1. | Launch the Windows Home Server Dashboard.
| 2. | Select the Users section.
| 3. | Click Set the Password Policy. The Dashboard opens the Change the Password Policy dialog box, shown in Figure 1.
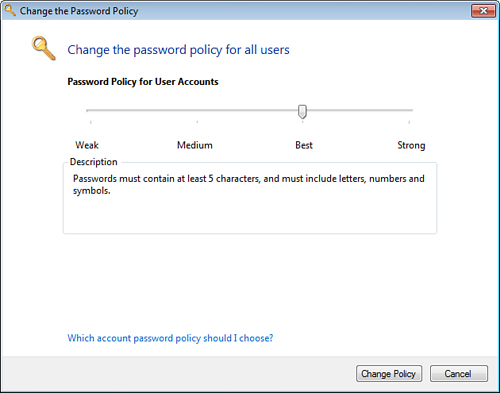
| 4. | Click and drag the Password Policy for User Accounts slider to the policy setting you want: Weak, Medium, Best, or Strong.
| 5. | Click Change Policy and then click OK when Windows Home Server confirms the change.
|
Customizing the Password Length Requirement
You saw in the previous section that each Windows Home Server password policy has a length component:
- Weak—Passwords can be any length.
- Medium—Passwords must be at least five characters.
- Best—Passwords must be at least five characters.
- Strong—Passwords must be at least seven characters.
To increase security on
your Windows Home Server, you might want to override these minimums. For
example, you might want to require a minimum length of 8 characters or
more for all users to make your network even safer from potential
Internet-based intrusions.
You can override the minimum password length using the Local Group Policy Editor. Follow these steps:
1. | Log on to the Windows Home Server computer, or establish a Remote Desktop connection to the server.
| 2. | Select Start, type group, and then click Edit Group Policy in the search results. The Local Group Policy Editor appears.
| 3. | Select the Computer Configuration, Windows Settings, Security Settings, Account Policies, Password Policy branch.
| 4. | Double-click the Minimum Password Length policy.
| 5. | Use the Password Must Be at Least text box to type your new minimum password length, and then click OK.
| 6. | Close the Local Group Policy Editor.
|
Building a Strong Password
If you just use your home
network locally, the passwords you assign to each user account aren’t
that important from a security point of view. Your goal should be to
make them easy to remember and avoid those “I forgot my password!” tech
support calls. The security landscape changes drastically when you add
users to the Remote Desktop Users group, and thus enable them to connect
to the network via the Internet. In this case, it’s crucial to supply
remote users with strong passwords. Ideally, when you’re creating such a
password, you want to pick one that that provides maximum protection
without sacrificing convenience. Follow these guidelines when choosing a
password:
Tip
The password guidelines I
provide will ensure that your passwords exceed Windows Home Server’s
password policy complexity minimums. For an extra challenge, submit the
password (or, ideally, text that’s similar to your password) to an
online password complexity checker. Microsoft runs such a checker at www.microsoft.com/protect/fraud/passwords/checker.aspx. You can also run a Google search on “password complexity checker” to see others.
- Use passwords that are at least eight characters long—Shorter passwords are susceptible to programs that try every letter combination. You can combine the 26 letters
of the alphabet into about 12 million different five-letter word
combinations, which is no big deal for a fast program. If you bump
things up to eight-letter passwords, however, the total number of
combinations rises to 200 billion,
which would take even the fastest computer quite a while. If you use
12-letter passwords, as many experts recommend, the number of
combinations goes beyond mind-boggling: 90 quadrillion, or 90,000 trillion!
- Mix up your character types—The
secret to a strong password is including characters from the following
categories: lowercase letters, uppercase letters, numbers, and symbols.
If you include at least one character from three (or, even better, all
four) of these categories, you’re well on your way to a strong password.
- Don’t be too obvious—Because
forgetting a password is inconvenient, many people use meaningful words
or numbers so that their password will be easier to remember.
Unfortunately, this means that they often use extremely obvious things
such as their name, the name of a family member or colleague, their
birth date or Social Security number, or even their system username.
Being this obvious is just asking for trouble.
Caution
After going to all this
trouble to create an indestructible password, don’t blow it by writing
it on a sticky note and then attaching it to your notebook keyboard!
Even writing it on a piece of paper and then throwing the paper away is
dangerous. Determined crackers have been known to go through a company’s
trash looking for passwords. (This is known in the trade as dumpster diving.)
Also, don’t use the password itself as your Windows 7, Vista, or XP
password hint. Finally, if you’ve thought of a particularly clever
password, don’t suddenly become unclever and tell someone. Your password
should be stored in your head alongside all those “wasted youth” things
you don’t want anyone to know about.
Changing the Password on the Client
If you already have a user
account on the client computer, you might want to adjust the account
password before adding the account to Windows Home Server. For example,
if you’ll be accessing the network remotely with the account, you might
want to specify a strong password when you set up the account in Windows
Home Server. If you know the new password you want to use, it makes
sense to update the client account with the new password in advance.
If you’re running Windows 7 or
Vista on the client, or if you’re running XP with the Welcome screen
disabled, follow these steps to change an account password:
1. | Log on to the account you want to modify.
| 2. | Press Ctrl+Alt+Delete.
| 3. | Click Change a Password. (Click Change Password in XP.)
| 4. | Type the old password in the appropriate box.
| 5. | Type
the new password in the appropriate box, and then type it again in the
Confirm Password text box. (It’s Confirm New Password in XP.)
| 6. | Press Enter. Windows changes the password.
| 7. | Click OK.
|
If your client is running XP with the Welcome screen enabled, follow these steps to change an account password:
1. | Log on to the account you want to modify.
| 2. | Select Start, Control Panel, User Accounts.
| 3. | Click the account you want to work with.
| 4. | Click Change My Password.
| 5. | Use the text boxes provided to type your old password, your new password (twice), as well as an optional password hint.
| 6. | Click Change Password.
|
Adding the User Account
Here are the steps to add an account to Windows Home Server:
1. | Launch the Windows Home Server Dashboard.
| 2. | Select the Users section.
| 3. | Click Add a User Account. The Add a User Account Wizard appears.
| 4. | Type the user’s first name and last name in the appropriate boxes. (The latter is optional.)
| 5. | Type the user’s account (that is, logon) name.
Note
The logon name can consist
of only letters, numbers, spaces, periods (.), hyphens (-), or
underscores (_). The name can’t end with a period, and you must use at
least one letter or number. Also, the name must be unique among the
Windows Home Server accounts.
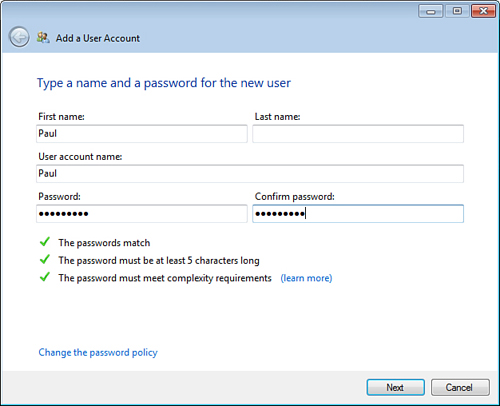
| 6. | Type the password and then type it again in the Confirm Password text box. Keep an eye on the following items (see Figure 2):
- The Passwords Match— You see a check mark beside this item if you typed both passwords identically.
- The Passwords Must Be at Least X Characters Long—
If the password meets or exceeds the length requirements specified by
the Windows Home Server password policy, a check mark appears beside
this item. You don’t see this item if you’re using the Weak password
policy.
- The Password Must Meet Complexity Requirements—
If the password meets or exceeds the complexity requirements specified
by the password policy, a check mark appears beside this item. You don’t
see this item if you’re using either the Weak or the Medium password
policy.
| 7. | Click Next. The Add a User Account Wizard prompts you to specify the user’s access to the shared folders (see Figure 3).
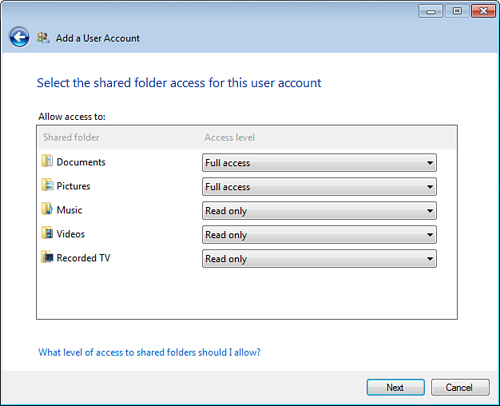
| 8. | For
each shared folder, use the list to select the option that corresponds
to the access you want to give: Full Access, Read Only, or No Access.
| 9. | Click Next. The Add a User Account Wizard prompts you to specify the user’s remote web access permissions (see Figure 4).

| 10. | If
you want to give the user remote web access, leave the Allow Remote Web
Access option selected, and then activate the check box beside each
feature that you want the user to access via the web. If, instead, you
don’t want the user to be able to access the network over the web,
select the Do Not Allow Remote Web Access option.
| 11. | Click
Create Account. Windows Home Server adds the user account, sets the
shared folder access, and creates a shared folder for the user. If you
left the Allow Remote Access option activated, Windows Home Server adds
the user to the appropriate security groups (such as
RA_AllowShareAccess).
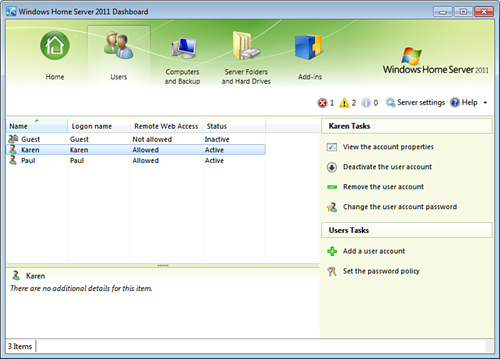
| 12. | Click Close. The account appears in the Windows Home Server Dashboard’s Users section, as shown in Figure 5.
|
Note
Remember that you can add a maximum of 10 user accounts to Windows Home Server.
|